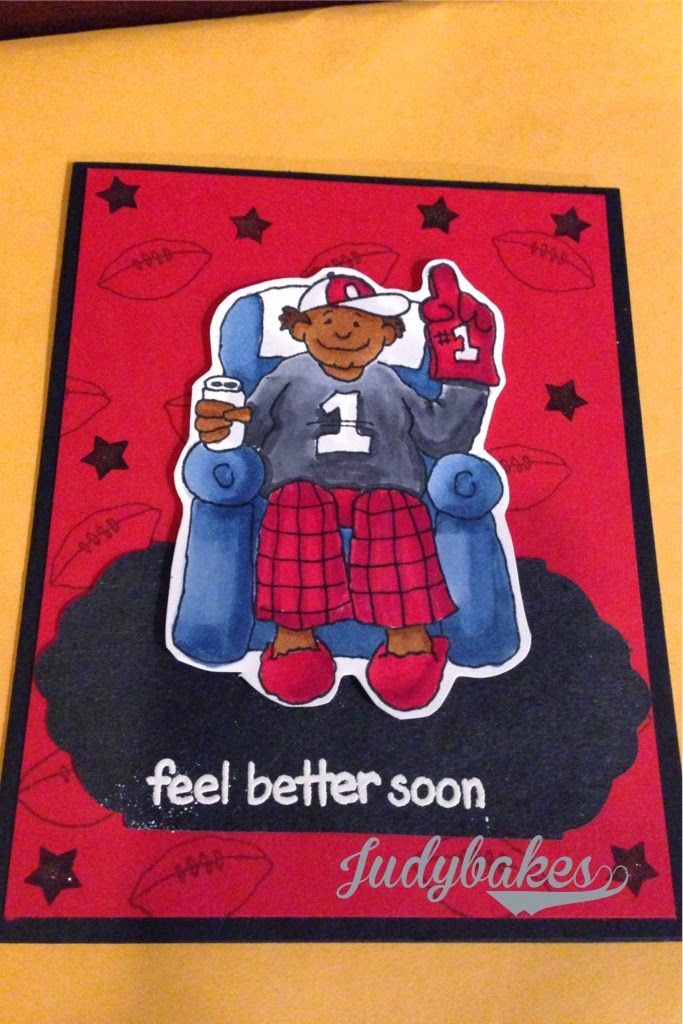
Just popping in to share a card I made for my husband's co-worker. Wow. My husband asked ME to make a card ( and justify my crafty spending?). Uh oh.. pressure is on. How do I represent my {expensive} crafty hobby in just one card?
Honestly, I love making cards because you can make it personal. My husband said he often talks to his co-worker about sports and is a huge Atlanta Falcons fan. Ideas were filling my head. Hmm get well card for a sports fan? I remembered that I had purchased a stamp a while back and now was the perfect time to finally use it ( I knew it would come in handy one day..).
Here is the process video:
Here is the finished card:
Let me know what you think!
I hope I have inspired one of you to create something today :)
I know it's been a while since I posted on my blog. "Life" has taken over again. So I've been making memories more than documenting them these days- which is definitely a good thing. If you don't make memories, then how can you document them, right?
So what have I been up to lately? We celebrated Aiden's 4th birthday at the end of last month, and the following week we headed to New York City :) Super fun! My husband and I grew up in New York so it was nice to head back to see family and of course hit all the restaurants and eat all the yummy foods we've been craving.
I finally had a chance to print out my photos and do some pocket page style scrapbooking about our trip. Since I had so many photos, I used a lot of collage style photos and all I really needed was some embellishments.
Most of you know that I LOVE STAMPS. I use stamps for cards AND I love to use stamps on my layouts, especially my pocket style layouts. The pocket style has individual cards so it's like making a mini card for each pocket. So what better way to embellish than with stamps??
For my layout, I am using Create Indie Stamps. I responded to their Contributor Call and was chosen! Yipee! Since I already own most of their stamps and truly enjoy using them, I was delighted to be chosen to showcase them. I used a few of their stamps sets: Recipe, Flair it Up & City. They were all so appropriate for all my foodie and city shots. I inked them up with the Memento dew drop in Danube Blue and they all stamped out beautifully.
Be sure to snatch up the Flair it Up stamp set because it is now on sale and about to retire :(
My nephew's birthday is coming up so I made a card for him :) Birthday cards make up the majority of the cards that I make and send out. For me, masculine cards are difficult for me to create followed by teen cards. My nephew is turning 12!! Wow. So no more of those cutesy cards, huh? Well, it's hard not to make a cutesy card with funny puns. Anyway, I tried to keep it simple as always and cute but not too cute…
I can't believe 4 years ago, at 2:20am my water broke and a few hours later, Aiden came into my world. He has given me joy and he is my world. We celebrated his birthday on Saturday with his friends at the play gym. He had a Cars theme. So for his birthday, I wanted to make a Cars/ Lightning McQueen birthday card.
So… I dusted off my Imagine and I reluctantly dug out the Cars cartridge. For those of you that have these Disney theme carts know what I mean. They usually have so many intricate cuts and are such a pain to piece together. Honestly, in hindsight, I should have just printed off something from the computer and fussy cut it. Or printed an image off and colored it with my copics.
My Imagine was off calibration so I had to re-calibrate it after I already cut the image..ugh. Then the red I chose was more of an orange color so I decided to just use red card stock. It took me way longer than I had time for.
This is how it turned out:
I had to go in and color in spots where cuts were off. I also chose not to cut the itty bitty pieces and decided to use my copics instead. Not my best work at all. I chose to cut it at 4.5 which is pretty large but that's the only way I can deal with the small pieces.
What are your tips for cutting out these detailed intricate cuts?? I'd love to know :)
Thanks for stopping by!!
Recently, I shared a post showing a pillow box I made for a graduation gift holder. Pillow boxes are a great way to package up a gift. You can insert a gift card, or smaller items like jewelry wrapped in tissue paper. You can even fill it up with candy (my favorite gift-yum!). They are great for that last minute gift where you don't have time to go out and find a box or gift bag. All you need is pretty paper (which all scrapbooker/crafters have), tape and the WRMK pillow box punch board.
I've had my punch board for a while but it's been sitting in my room waiting to be used. The board itself comes with a bone folder and 2 built in punches. The instructions are printed on the board itself. I was surprised at how easy it was.
Here are the step by step photo instructions:
1. First you decide what size box you'd like & what paper you want to use. I used a 6x6 sheet of paper.
2. Line up the left edge of the paper on the line on the middle of the board.
3. Press down on the green oval button (it is a punch) to punch a notch.
4. Use the bone folder to score along the top curve and down the right edge.
5. Repeat to the end of the sheet of paper.
6. Flip the paper over to the underside and repeat with punch, score.
7. Then flip the board to the other side to punch the 1/2 circle notches.
8. Cut from the edge to the score line at a slight angle.
9. Crease at the score lines.
10. Adhere strong adhesive to one edge to connect the two sides/edges.
11. Push the notched ends in.
12. Pillow box is ready to fill with goodies :)
Here is my video of using the punch board for the first time:
It took me a total of 7:27 minutes to make the pillow box from start to finish in real time! Amazing. Not too shabby for the first time and for reading instructions and picking out the paper.
RECAP Pros: easy to use, instructions on the board itself, good punch, good bone folder, light weight, can make pillow boxes in different sizes, punch can be used for other purposes (punching notches or curves) Cons: as with any tool or punch, you need to line it up correctly and precisely. Recommendations: use a light to medium weight paper to be able to "fluff" the pillow box up better. Stiffer papers will be harder to fluff out.
Thanks for stopping by and being inspired :)
Hugs,
Judy
Today I actually baked something crafty ;) I jumped on the bandwagon and baked up some DIY enamel dots. Enamel dots are one of my favorite embellishments to use. They are small yet add such a nice effect on your project. They add dimension, color and shine to an otherwise dull project. They are great to use on a project that has "something missing" or to fill in that "empty spot". I use them on my cards in bunches of threes near sentiments and on layouts to add a little pop of color. They are the perfect size for project life.
Here are some examples where I've added them to my projects:
So here's my recipe:
preheat oven to 400 degrees
line your baking sheet with parchment paper
place your beads (I used pony beads but perler beads can also be used) standing up
bake in oven for 10 minutes.
done.
Yes. It's that simple.
Pony beads come in mini size as well. They will look like this:
The regular sized beads come out like this:
I prefer the smaller mini size ones but either way they both look absolutely yummy! Look how pretty the colors are. Look at the beautiful glossy shine. Lovely.
Enamel dots regularly cost anywhere between $2 to $5 for a package of 40. My pony beads came in a tub of 3200 for the price of $4.95! You do the math. Amazing. I think I am addicted.
But Beware: there was a slight odor to the pony beads. I do not know if there are any harmful chemicals or vapors being emitted. I do recommend that you are in a well ventilated area - either keep the windows open or fan on or better yet, do both. I believe the perler beads are meant for melting. I did not have any perler beads on hand but if I do eventually buy some, I will try and do a comparison.